
Buttermilk Biscuits
If you've never had the pleasure of experiencing fresh, homemade Buttermilk Biscuits first thing in the morning, you're completely missing out! These are buttery, flaky, delicious, and the ideal delivery device for pretty much all jams, jellies, honey, or just plain butter.

These are also perfect for sausage or bacon, egg, and cheese breakfast sandwiches. But my absolute favorite way of serving these is to smother them with sausage gravy!

These biscuits aren't limited to breakfast or brunch alone! Fold in some cheddar cheese and jalapenos for a spicy, savory side dish for almost any dinner. You could even swap the brioche buns in my Buttermilk Fried Chicken Sandwich recipe for these biscuits (not to mention you'll already have buttermilk on hand too!).
Biscuit Ingredients
These biscuits use some very straightforward and simple ingredients. The most important part of this recipe is cutting the all-purpose flour with a small amount of cornstarch. This helps lower the amount of available protein in the flour. The lower the protein amount, the less gluten will form. The less gluten that forms, the lighter and more tender your biscuits will be. The complete list of ingredients is listed below.

- All-Purpose Flour
- Corn Starch
- Cold, Unsalted Butter
- Baking Powder
- Kosher Salt
- Buttermilk
- Heavy Cream
Instructions
The process of mixing and shaping your dough is actually more important than the ingredients used. The crucial part of making this recipe is to not overwork the dough when adding the buttermilk. This will cause the biscuits to be very dense, chewy, and rock-hard. There's a bit of science that goes into this, but essentially, this happens because overmixing or stirring causes more gluten to form in the dough. More gluten = more texture, and more texture = dense biscuits, which is not what we're after.
To combat this, you add the buttermilk last and quickly, but gently, work the dough together. I have outlined the complete process below:
- To begin, sift together the flour, salt, and cornstarch in a large mixing bowl.
- Add the cold, unsalted butter to the flour mixture by cubing it, then smearing the pieces into the flour with your fingers and thumbs.
- Once the butter is thoroughly mixed in, add the buttermilk and heavy cream and gently combine with a rubber spatula until a shaggy dough forms.
- Gently fold the dough over itself several times, kneading together until the dough just begins to become smooth. This should only take about a minute or two. (The dough should be fairly smooth, but you should still see individual pieces of butter dotted through the dough.)
- Turn the dough out onto a lightly floured work surface and gently roll it into a flat disc that is about ¾-inch thick.
- Cut the dough into individual biscuit shapes, then transfer to a parchment paper-lined baking sheet. (I like to use a biscuit cutter, egg ring mold or the top of a pint glass or mug as a cutter to get approximately 3-inch-wide biscuits.)
- Pro Tip: Place the biscuits close together on the baking sheet, but not touching. This helps them rise better and keeps the sides from getting crisp. If you want a crispier biscuit, space them out on the baking sheet.
- Brush with melted butter, then bake for 18 to 20 minutes at 450°F until the biscuits begin to brown.
- Transfer to a large bowl lined with a kitchen towel and cover
Pro-tip: Reheat leftover biscuits by wrapping them in tin foil and baking at 350°F for 8 to 10 minutes until soft.
Buttermilk Biscuit How To:

1. Sift the dry ingredients together. 
2. Add cold butter by smearing it into the flour mixture with your fingers. 
3. Add the buttermilk and heavy cream. 
4. Gently combine until a shaggy dough forms. 
5. Knead the dough several times onto itself to create layers to further combine it. 
6. Continue to knead until a smooth dough forms. (This should take only a minute or two by hand.) 
7. Turn the dough onto a floured work surface, and roll out until it's about ¾ to 1-inch thick. 
8. The dough should be combined and smooth, but still be slightly shaggy. You should see streaks of butter dotted through the dough. -
9. Use an egg ring or the top of a pint glass to cut biscuits. 
10. Place on a greased baking sheet. (I have since updated this to use a parchment paper-lined baking sheet. I have found that to be an easier and cleaner option.) -
11. Brush with melted butter right before baking. 
12. Finished Biscuits


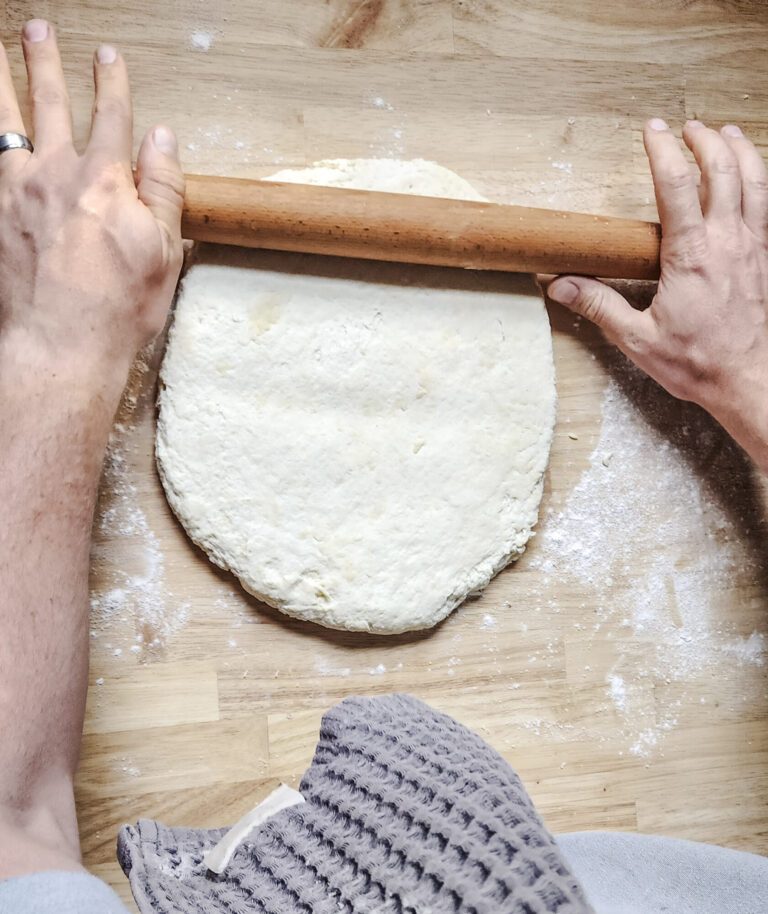


Mixing the dough by hand versus using a stand mixer is another key to knowing when the dough is ready. It really helps you get a feel for when the dough is just right. When you use a stand mixer, you're more likely to just go by sight, and there's a tendency to overwork the dough. It may take one or two times to get a feel for things, so even if they don't turn out perfect the first try, I can almost guarantee you will end up with better results the second time around. It took me several attempts to nail this process down, but it has been absolutely worth it to stick with it!

Buttermilk Biscuit Serving Suggestions
There are a TON of uses for these Buttermilk Biscuits. These are great with a bit of butter and some jam, preserves, or jelly.

These are also a fantastic base for breakfast sandwiches. My favorite is sausage, egg, and cheese, but feel free to use bacon, ham, Canadian bacon, etc. Get creative with different cheeses, sauces, and condiments, too!
Did you make this recipe for Buttermilk Biscuits?
Let me know in the comments below if they're better than your grandma's, and don't forget to leave a rating!
Recipe

Buttermilk Biscuits
Equipment
- Large Mixing Bowl
- Rubber Spatula
- Rolling Pin
- Parchment Paper
- Small Sauce Pan
- Basting Brush
Ingredients
- 4 ¾ Cups, Plus 2 Tablespoons All-Purpose Flour (For a more accurate volume measurement, use a tablespoon to fill the measuring cup, and scrape the excess off the top.)
- 2 Tablespoons Cornstarch
- 8 Tablespoons Unsalted Butter, Cold (1 Stick) - Cut into ¼-inch Cubes
- 1 Tablespoon Baking Powder
- 1 Tablespoon Fine sea salt
- 1 ¾ Cups Buttermilk
- ¼ Cup Heavy Cream
- 3 Tablespoons Unsalted Butter Melted (For Brushing Biscuit Tops)
Instructions
- Preheat the oven to 450°F.
- Sift together the flour, salt, baking powder, and cornstarch in a large mixing bowl.
- Add the cold, cubed, unsalted butter to the flour mixture. Smear the pieces into the flour mix with your fingers and thumbs until all of the butter is smeared and coated in flour.
- Add the buttermilk and heavy cream, and gently combine the dough with a rubber spatula until a shaggy dough forms, about 1 minute.
- After a shaggy dough forms, gently fold the dough over itself and knead several times. Repeat this process 1 to 2 times until the dough just starts to become smooth. This should only take about a minute or two. (The dough should be fairly smooth, but you should still see individual pieces of butter dotted through the dough.)
- Turn the dough out onto a lightly floured work surface and gently roll it into a flat disc that is about ¾-inch thick.
- Using a biscuit cutter (preferred), egg ring mold, or top of a mug or pint glass, press straight down into the dough without twisting to cut the dough into individual biscuits, then transfer to a parchment paper-lined baking sheet. Take care to place the biscuits close together, but not touching. This helps the biscuits rise more, and helps keep the sides soft and tender. For a harder biscuit, space them out more, and the sides will cook more.
- Brush the tops of the biscuits with melted butter. Bake for 18 to 20 minutes until the biscuits just begin to brown.
- Remove the biscuits from the oven and brush with additional melted butter if desired. Place them in a bowl and cover with a towel to keep them warm until you're ready to serve them.



Don't tell Grandma but these are better than hers! Perfectly flaky and crispy with a soft center. So glad I gave this recipe a try. Will be making these again very soon.
Thanks so much Rebecca! I'm so happy to hear that you enjoyed this recipe!